http://javapapers.com/android/android-hello-world/
Showing posts with label firstProgram / helloworld. Show all posts
Showing posts with label firstProgram / helloworld. Show all posts
Friday, 1 July 2011

Thursday, 17 March 2011
Spring IDE and eclipse - Setting up spring with Eclipse
Setting up the spring ide in Eclipse
For this you should refer to the article – Installing Spring IDE plugin in eclipse using update site.Creating the Spring Project in Eclipse
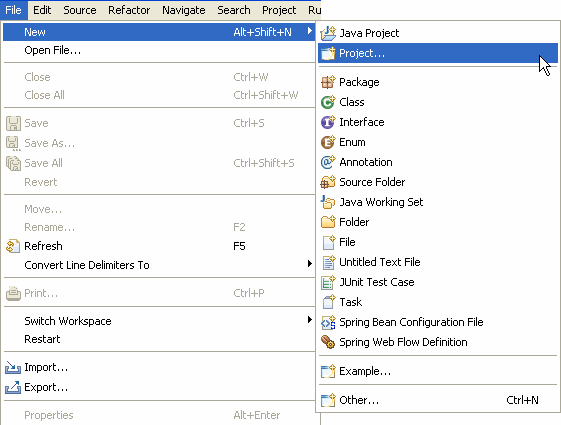
1. First create a Spring project, go to File -> New -> Project.
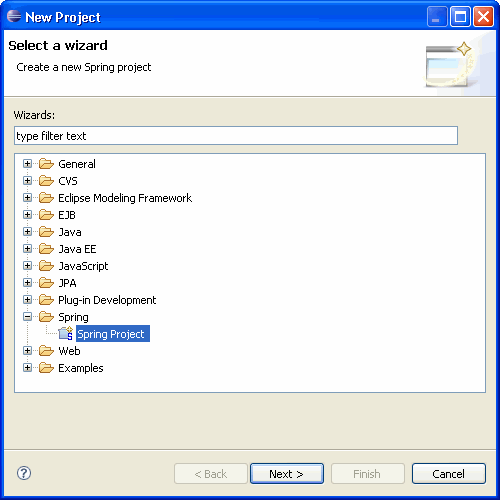
2. Select Spring Project and click Next.
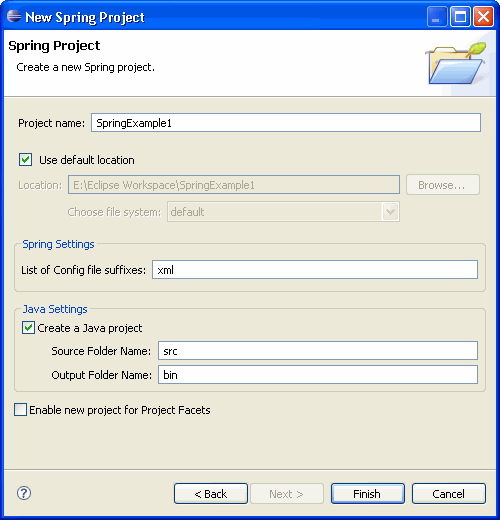
3. Enter the project name and click Finish.
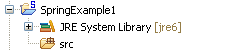
The "S" in the upper right corner indictes it is a Spring Project.
Adding Beans and Spring config file
Create the Bean
Right click the src package and create a new package "com.vaani". Create the following HelloWorld class
package com.vaani;

public class HelloWorld {

private String message;
   public void setMessage(String message) {
      this.message = message;
   }

   public void display(){
      System.out.println(message);
   }
}
The HelloWorld class has a message property and its value is set using the setMessage() method. This is called setter injection. Instead of directly hard coding the message, we inject it through an external configuration file. The design pattern used here is called Dependency Injection design pattern and it is explained in detail in the next example. (Spring Dependency Injection)The HelloWorld class also has a display() method to display the message.
2. Create the bean configuration file
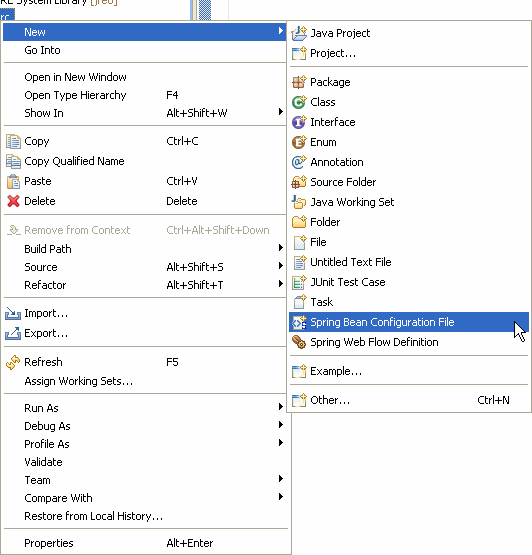
Now we have created the HelloWorld bean class, the next step is to add an entry for this in the bean configuration file. The bean configuration file is used to configure the beans in the Spring IoC container. To create a new bean configuration file right click the src folder and select New -> Spring Bean Configuration File.
Now we have created the HelloWorld bean class, the next step is to add an entry for this in the bean configuration file. The bean configuration file is used to configure the beans in the Spring IoC container. To create a new bean configuration file right click the src folder and select New -> Spring Bean Configuration File.
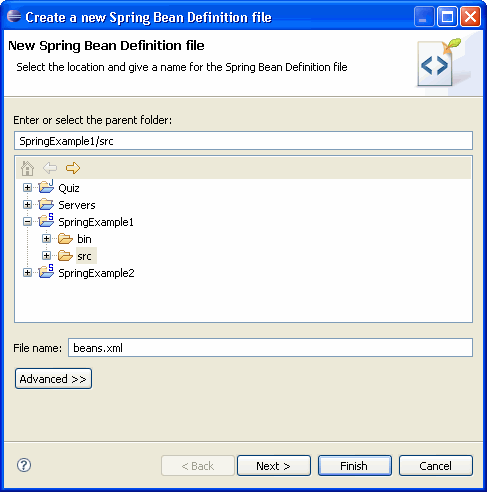
Enter the bean name and click Next.
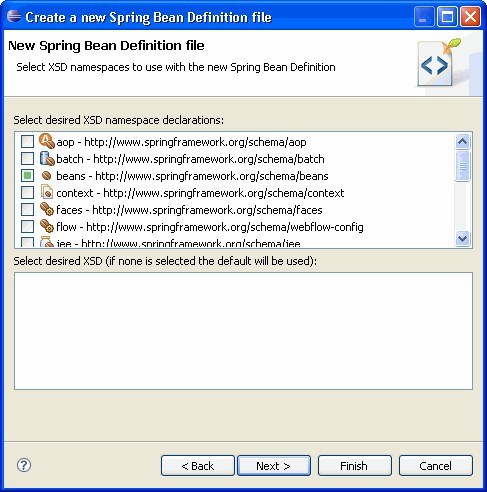
Select the beans option and click Finish.
Now the Spring configuration file is created. Add the following code to created an entry for the HelloWorld bean class.
<?xml version="1.0" encoding="UTF-8"?>

<beans xmlns=http://www.springframework.org/schema/beans
 xmlns:xsi=http://www.w3.org/2001/XMLSchema-instance

 xsi:schemaLocation="                   http://www.springframework.org/schema/beans  http://www.springframework.org/schema/beans/spring-beans.xsd">

<bean id="helloWorld" class="com.vaani.HelloWorld">
     <property name="message" value="Hello World!"></property>
</bean>

</beans>
The id attribute of the bean element is used to give a logical name to the bean and the class attribute specifies the fully qualified class name of the bean. The property element within the bean element is used to set the property value. Here we set the message property to "Hello World!".
If you want to display a differnt message, the only change you need to is to change the value of the message in the bean configuration file. This is one of the main benefits of using the Dependency Injection design pattern, this makes the code loosely coupled.
If you want to display a differnt message, the only change you need to is to change the value of the message in the bean configuration file. This is one of the main benefits of using the Dependency Injection design pattern, this makes the code loosely coupled.
Create the Demo class
To dispaly the message, create the following HelloWorldApp class.
To dispaly the message, create the following HelloWorldApp class.
package com.vaani;


import org.springframework.context.ApplicationContext;

import org.springframework.context.support. ClassPathXmlApplicationContext;public class HelloWorldApp {
   public static void main(String[] args) {
      ApplicationContext context = new
ClassPathXmlApplicationContext("beans.xml");
      HelloWorld helloWorld =
       (HelloWorld) context.getBean("helloWorld");
      helloWorld.display();
   }


}
First we instantiate the Spring IoC container with the bean configuration file beans.xml. We use the getBean()method to retrive the helloWorld bean from the application context and call the display() method to display the message in the console.
The figure shows the final directory structure of the hello world example.
The figure shows the final directory structure of the hello world example.

Adding the JARS
Add the following jar files to the classpath.
Download spring api from here and unzip it.
To add these jars, add them as external jars like this (for spring api's)
Add the following jar files to the classpath.
1.antlr-runtime-3.02.commons-logging-1.0.43.org.springframework.asm-3.0.0.M34.org.springframework.beans-3.0.0.M35.org.springframework.context-3.0.0.M36.org.springframework.context.support-3.0.0.M37.org.springframework.core-3.0.0.M38.org.springframework.expression-3.0.0.M3Note that each and every jar is important. Download spring api from here and unzip it.
To add these jars, add them as external jars like this (for spring api's)

Adding the commons-logging jar, download jars from here. If you don't add you may get this error - java.lang.NoClassDefFoundError: org/apache/commons/logging/LogFactory
To execute the example run the HelloWorldApp file. The "Hello World!" message gets printed on the console.
Download
You can download the source code from here.
Monday, 7 February 2011
Ant Hello World
We'll continue our Ant tutorials with "Hello World," only now we'll execute a Java class. Start by creating a simple hello class as shown below.
public class hello {
    public static void main( String[] args )
    {
        System.out.println( "Hello World" );
    }
}
$ javac hello.java
$ jar -cvf hello.jar hello.class
added manifest
adding: hello.class(in = 415) (out= 285)deflated 31%)
$ java -classpath hello.jar hello
Hello World
<project default="compile">
  <target name="compile">
    <javac srcdir="." />
  </target>

</project>
$ rm *.class
$ ant -f hello.xml compile
Buildfile: hello.xml

compile:
    [javac] Compiling 1 source file

BUILD SUCCESSFUL
Total time: 4 seconds
<project default="compile">
  <target name="compile">
    <javac srcdir="." />
  </target>

  <target name="jar" depends="compile">
    <jar destfile="hello.jar"
         basedir="."
         includes="**/*.class"
         />
  </target>
</project>
$ rm *.jar
$ ant -f hello.xml jar
Buildfile: hello.xml

compile:

jar:
      [jar] Building jar: /Tutorial/Ant/Jar/hello.jar

BUILD SUCCESSFUL
Total time: 2 seconds
$ jar -tvf hello.jar
jar -tvf hello.jar
     0 Wed Jan 22 17:06:32 EST 2003 META-INF/
    55 Wed Jan 22 17:06:32 EST 2003 META-INF/MANIFEST.MF
   335 Wed Jan 22 16:36:16 EST 2003 hello.class
<project default="compile">
  <target name="compile">
    <javac srcdir="." />
  </target>

  <target name="jar" depends="compile">
    <jar destfile="hello.jar"
         basedir="."
         includes="**/*.class"
         />
  </target>

  <target name="run" depends="jar">
    <java classname="hello"
          classpath="hello.jar"
          fork="true"
          />
  </target>
</project>
$ant -f hello.xml run
Buildfile: hello.xml

compile:

jar:

run:
     [java] Hello World

BUILD SUCCESSFUL
Total time: 2 seconds
Subscribe to:
Posts (Atom)