Wednesday, 27 April 2011

Batch processing

Batch solutions are ideal for processing that is time and/or state based:
  • Time-based: The business function executes on a recurring basis, running at pre-determined schedules.
  • State-based: The jobs will be run when the system reaches a specific state.
Batch processes are usually data-centric and are required to handle large volumes of data off-line without affecting your on-line systems. This nature of batch processing requires proper scheduling of jobs.
See quartz as one solution.

For more information on batch processing visit: "High volume transaction processing in J2EE"

Quartz example

 Quartz is a full-featured, open source job scheduling system that can be integrated with, or used along side virtually any Java Enterprise of stand-alone application. The Quartz Scheduler includes many enterprise-class features, such as JTA transactions and clustering. The following is a list of features available:
  • Can run embedded within another free standing application
  • Can be instantiated within an application server (or servlet container).
  • Can participate in XA transactions, via the use of JobStoreCMT.
  • Can run as a stand-alone program (within its own Java Virtual Machine), to be used via RMI
  • Can be instantiated as a cluster of stand-alone programs (with load-balance and fail-over capabilities)
  • Supoprt for Fail-over
  • Support for Load balancing.
Quartz components

  1. Scheduler Task – Pure Java class, the task you want to schedule. 
  2. Scheduler Job – Get the “Scheduler Task” from “JobDetail” via “task name“, and specify which schedule task (method) to run.
  3. Scheduler JobDetail – Define a “task name” and link it with “Scheduler Job”.
  4. Trigger – When will run your “Scheduler JobDetail”.
  5. Scheduler – Link “JobDetail” and “Trigger” together and schedule it.
Understanding the whole sequence by code.

Prequisities of coding
The following example demonstrates the use of Quartz scheduler from a stand-alone application. Follow these steps to setup the example, in Eclipse.
  1. Download the latest version of quartz from opensymphony.
  2. Make sure you have the following in your class path (project-properties->java build path):
    • The quartz jar file (quartz-1.7.0.jar).
    • Commons logging (commons-logging-1.1.1.jar)
    • Add any server runtime to your classpath in eclipse. This is for including the Java transaction API used by Quartz. Alternatively, you can include the JTA class files in your classpath as follows
      1. Download the JTA classes zip file from the JTA download page.
      2. Extract the files in the zip file to a subdirectory of your project in Eclipse.
      3. Add the directory to your Java Build Path in the project->preferences, as a class directory.

The code components:

1. Scheduler Task

Create a pure Java class, this is the class you want to schedule.
package com.vaani.common;
 
public class RunMeTask
{
public void printMe() {
System.out.println("Run Me ~");
}
}

2. Scheduler Job

Create a ‘job’ to implement the Quartz Job interface, and also the execute() method. Get the scheduler task from Job Details via “task name”, and specify which schedule task (method) to run.

package com.vaani.common;
 
import java.util.Map;
 
import org.quartz.Job;
import org.quartz.JobExecutionContext;
import org.quartz.JobExecutionException;
 
public class RunMeJob implements Job
{
public void execute(JobExecutionContext context)
throws JobExecutionException {
 
Map dataMap = context.getJobDetail().getJobDataMap();
RunMeTask task = (RunMeTask)dataMap.get("runMeTask");
task.printMe();
}
}
 
or  

//you can use already defined scheduler tasks like calendar etc..any POJO
public class RunMeJob implements Job
{
public void execute(JobExecutionContext context)
throws JobExecutionException {
 
System.out.println("Executing job at: " + 
Calendar.getInstance().getTime()
+ " triggered by: " + context.getTrigger().getName());
}}

3. Scheduler JobDetail

Initialize a JobDetail object, link your scheduler job with setJobClass(RunMeJob.class); method, define a task name and put it into Job data map, dataMap.put(“runMeTask”, task);. This “task name” is the only link between your Job and JobDetail.
P.S : job.setName(“runMeJob”) has no special function, just a descriptive name, you can put anything.
RunMeTask task = new RunMeTask();
 
//specify your sceduler task details
JobDetail job = new JobDetail();
job.setName("runMeJob");
job.setJobClass(RunMeJob.class);
 
Map dataMap = job.getJobDataMap();
dataMap.put("runMeTask", task);

4. Quartz Triggers

Quartz triggers are used to define when the Quartz will run your declared scheduler job. There are two types of Quartz triggers :
  • SimpleTrigger – allows to set start time, end time, repeat interval to run yout job.
  • CronTrigger – allows Unix cron expression to specify the dates and times to run your job.
Code snippet – SimpleTrigger
SimpleTrigger trigger = new SimpleTrigger();
trigger.setName("runMeJobTesting");
trigger.setStartTime(new Date(System.currentTimeMillis() + 1000));
trigger.setRepeatCount(SimpleTrigger.REPEAT_INDEFINITELY);
trigger.setRepeatInterval(30000);
Code snippet – CronTrigger
//configure the scheduler time
CronTrigger trigger = new CronTrigger();
trigger.setName("runMeJobTesting");
trigger.setCronExpression("0/30 * * * * ?");

5. Scheduler

Link the “JobDetail” and “Trigger” together and schedule it.
//schedule it
Scheduler scheduler = new StdSchedulerFactory().getScheduler();
scheduler.start();
scheduler.scheduleJob(job, trigger);


Sample code

SimpleJob:
public class SimpleJob implements Job {
public void execute(JobExecutionContext context) 
throws JobExecutionException {
System.out.println("Executing job at: " + Calendar.getInstance().getTime()
+ " triggered by: " + context.getTrigger().getName());
}
}


Scheduling job with runner:
public class QuartzTest {
public static void main(String[] args) {
try {
// Get a scheduler instance.
SchedulerFactory schedulerFactory = new StdSchedulerFactory();
Scheduler scheduler = schedulerFactory.getScheduler();

long ctime = System.currentTimeMillis();

// Create a trigger.
JobDetail jobDetail = new JobDetail("Job Detail", 
"jGroup", SimpleJob.class);
SimpleTrigger simpleTrigger = new SimpleTrigger("My Trigger", "tGroup");
simpleTrigger.setStartTime(new Date(ctime));

// Set the time interval and number of repeats.
simpleTrigger.setRepeatInterval(100);
simpleTrigger.setRepeatCount(10);

// Add trigger and job to Scheduler.
scheduler.scheduleJob(jobDetail, simpleTrigger);

// Start the job.
scheduler.start();
} catch (SchedulerException ex) {
ex.printStackTrace();
}
}
}


Output
Apr 27, 2011 5:20:47 PM org.quartz.simpl.SimpleThreadPool initialize
INFO: Job execution threads will use class loader of thread: main
Apr 27, 2011 5:20:47 PM org.quartz.core.SchedulerSignalerImpl <init>
INFO: Initialized Scheduler Signaller of type: class org.quartz.core.SchedulerSignalerImpl
Apr 27, 2011 5:20:47 PM org.quartz.core.QuartzScheduler <init>
INFO: Quartz Scheduler v.1.7.3 created.
Apr 27, 2011 5:20:47 PM org.quartz.simpl.RAMJobStore initialize
INFO: RAMJobStore initialized.
Apr 27, 2011 5:20:47 PM org.quartz.impl.StdSchedulerFactory instantiate
INFO: Quartz scheduler 'DefaultQuartzScheduler' initialized from default resource file in Quartz package: 'quartz.properties'
Apr 27, 2011 5:20:47 PM org.quartz.impl.StdSchedulerFactory instantiate
INFO: Quartz scheduler version: 1.7.3
Apr 27, 2011 5:20:47 PM org.quartz.core.QuartzScheduler start
INFO: Scheduler DefaultQuartzScheduler_$_NON_CLUSTERED started.
Executing at: Wed Apr 27 17:20:47 IST 2011 triggered by: My Trigger
Executing at: Wed Apr 27 17:20:48 IST 2011 triggered by: My Trigger

References
The Unix cron expression is highly flexible and powerful, you can learn and see many advance cron expression examples in following website.
1. http://en.wikipedia.org/wiki/CRON_expression
2. http://www.quartz-scheduler.org/docs/examples/Example3.html

Monday, 25 April 2011

Spring AOP vs AspectJ

Spring AOP is simpler than using AspectJ as there is no requirement to introduce the compiler into build processes for Compile Time Weaving. If you only need to advise the execution of operations on Spring beans, then Spring AOP is the right choice. If you need to advise objects not created by the Spring container, then you will need to use AspectJ. You will also need to use AspectJ if you wish to advise join points other than simple method executions (for example, field get or set join points, and so on).When using AspectJ, you have the choice of the AspectJ language syntax or the @AspectJ annotation style. Clearly, if you are not using Java 5+ then the choice has been made for you… use the code style. If aspects play a large role in your design, and you are able to use the AspectJ Development Tools (AJDT) plugin for Eclipse, then the AspectJ language syntax is the preferred option: it is cleaner and simpler because the language was purposefully designed for writing aspects. If you are not using Eclipse, or have only a few aspects that do not play a major role in your application, then you may want to consider using the @AspectJ style and sticking with a regular Java compilation in your IDE, and adding an aspect weaving phase to your build script.

Moreover following are the conclusive differences in Spring AOP and AspectJ.
Spring-AOP : Runtime weaving through proxy using concept of dynamic proxy if interface exists or cglib library if direct implementation provided.
AspectJ: Compile time weaving through AspectJ Java Tools(ajc compiler) if source available or post compilation weaving (using compiled files).Also, load time weaving with Spring can be enabled – it needs the aspectj definition file and offers flexibility. Compile time weaving can offer benefits of performance (in some cases) and also the joinpoint definition in Spring -aop is restricted to method definition only which is not the case for AspectJ.

Weaving style of working with AOP

 Earlier we saw proxy style of handling aop, now we will see weaving style. Spring 2.5 supported LTW (load time weaving).
Weaving means bytecode instrumentation.

Types of Weaving
Code weaving comes in three flavors:

  • Load-time weaving(LTW): Aspect weaving is performed by the class loader when classes are first loaded.
    Weave class files when being loaded in VM
    i.e. Add aspect to class files OR Aspect + class files
  • Compile-time weaving: Aspects are weaved into the class files when they are compiled.
    Aspect + source code = class files
  • Binary Weaving (linker)
    Aspect + source/byte code = class files


Aspectwerkz and AspectJ works with both compile and load-time weaving.

Compile time weaving and binary weaving requires a seperate AspectJ compiler, which has nothing to do with spring. You will have to seperate lean AspectJ or try it out. Eclipse plugins are also available for AspectJ making it easier to achieve the same.

See how to configure the weaving method and proxy method of AOP in spring.


AOP support in spring

In spring, AOP is supported via 2 methods:
Click on the links to read in detail.

How to configure any of the methods in spring?

We need to decide with approach to use:
  • <aop:aspectj-autoproxy/> to enable proxy based AOP implementation.
  • <context:load-time-weaver /> to enable LTW ( load time weaving ) of classes.
    Works for Tomcat 5.5+, dm server 1.0+, weblogic 10, oc4j 10.x, glassfish.
    For standalone applications use:
    java-javaagent:spring-agent.jar ...

Spring's dynamic proxies for AOP

Till spring 2.0, spring's implementation is called as proxy-based AOP implementation irrespective of which AOP library you are using. These proxies essentially wrap a targ et object (eg. BankAccount instance) in order to apply aspects (SecurityManager calls) before and after delegation of the target object.
These proxies appear as the class of the target object to any client, making the proxies simple drop-in replacements anywhere the original target is used.

So before using AOP, code used to look like this:

But after using proxy pattern the code will look like this:


Since the client would be unaware that he is taling to the different class, the Proxy generated by Spring would either be sublcass of BankAccount or implement interfaces exposed by BankAccount class so that client class remains transparent to the changes in the configuration.
Client invokes methods exposed by the proxy, which in turn will execute interceptors configured for target bean.

Client will never know that he is calling the method of a proxy class. Proxy classes are wrappers around our actual components and contain same signature methods taking it 100% transparent to the system.

In spring, proxy classes are used in many places apart from AOP as well.

See how to configure the weaving method and proxy method of AOP in spring.

AOP : Tutorial

Need for AOP

Aspect-Oriented Programming (AOP) complements Object-Oriented Programming (OOP) by providing another way of thinking about program structure. 

Consider a following method code (say in a webservice method):

try{
   //start new session
   //some business logic
   //commit transaction
}catch(Exception ex)
{
   //handle exception
}finally{
   //close session
}
//logging
//return the output


So like this method above, there will be lots of other methods similar to this....But don't you think it will be nice if  we only deal with business logic, rather than writing the repeatative code like handling exceptions, logging,security management, etc. These code tidbits are called concerns or aspects or advices (though described below). These are used interchangeably, though there are slight differences, which we will see in course of time.

So this is where AOP comes into picture. We can simply write our code as a simple business logic, without dealing with above mentioned concerns or repeatative code. For eg. for security checks, you can add the authorization into the execution path with a type of IOC implementation called AOP or aspect oriented programming. 

See Aop introduction

AOP introduction

Need For AOP
First see need for aop.

Defining AOP
Aspect-Oriented Programming (AOP) complements Object-Oriented Programming (OOP) by providing another way of thinking about program structure.

Aspects
Aspects are concern of the application that apply themselves across the entire system. The SecurityManager is one example of system-wide aspect, as its hasPermissions methods are used by many methods. Other typical aspects include logging, auditing, exception handling, performance monitoring, transaction management. See need for aop . These are also called advice, interceptor or concernts.

Who handles these concerns?
These types of concerns are best left to framework hosting the application, allowing developers to focus more on business logic.

AOP frameworks available
There are lots of frameworks available for AOP in java, and each one calls the concerns with differnt names, written within parenthesis:
  • AOPAlliance API (interceptor)
  • AspectJ (Aspect)
  • Spring AOP (Advice)
  • Spring-AspectJ combination (Aspect)
For AOPAlliance, click here.
AspectJ plugin for eclipse ide can be downloaded from here.
For spring we will see in tutorial continued. Since spring 2.0 AspectJ is the best AOP implementation, so its also combined in spring as told above.

Weaving or interjection
An AOP framework, such as spring AOP will interject or weave aspect code transparently into your domain model at runtime or compile time. This means that while we may have removed calls to the SecurityManager from the Business class, it will be still executed in AOP framework.
The beauty of this technique is that both the domain model (eg. our business code, say BankAccount) and its user or client such as Customer, both are unaware of the enhancement to the code.

What are cross-cutting concerns?

The Separation of Concerns principal states that a concern is any piece of interest or focus in a program. Think about it in terms of a layered architecture with the layers being UI, Business, Service and Data. Each one of these layers is its own concern. These layers are "horizontal".
The UI layer is only concerned with display and user interaction and not with database connectivity; as such, the data layer is not concerned with determining if a user is eligible for a car loan (business rules). When you design your code you usually break up these concerns into their own modules (classes, assemblies, etc).
Logging, security, error handling and caching are also concerns but where do they fit in to this layered architecture? The answer is everywhere. These concerns are "vertical" or "cross-cutting" or "orthogonal" which means they touch each layer. UI needs logging and error handling just as the other layers do too.

More terminology on AOP.


Saturday, 23 April 2011

Adding external library (.jar ) to the Java classpath

The following describes how to add external jars to your project.
The following assumes you have a jar available.

Create a new Java project "ExternalJarTester". Create a new folder called "lib" (or use your existing folder) by right click on your project and selecting New -> Folder.


From the menu select File -> Import -> File system. Select your jar and select the folder lib as target.
Select your project, right mouse click and select properties. Under libraries select "Add JARs".
Eg. adding ant jar.

 Above thing can also be done by Configure build path in :
File->Build->Configure Build Path

Now Click Add External Jars and browse the external jar and add it.

Friday, 22 April 2011

Installing Spring IDE Plugin in Eclipse using update site

Prerequisites

Before starting ensure that you have the following installed:

If you know how to install eclipse plugin, use the Eclipse Software Update wizard to go to the SpringIDE update site to download the latest version (http://springide.org/updatesite).  Otherwise you can follow the tutorial.

Spring IDE

Spring IDE is an eclipse plug-in that helps in developing Spring Application. First we will see how to install the Spring IDE and later we will create our first Spring project using it.
To install Spring IDE, Go to Help -> Software Updates.

Click the "Add Site" button and enter "http://springide.org/updatesite" in the Add Site popup.

Select all the Spring IDE features and click Install.

Once the installation is complete you are done. Now let's see -  how to create the hello world example using the Spring IDE.

Installing new plugin in eclipse

To install plugins in eclipse we follow following steps:

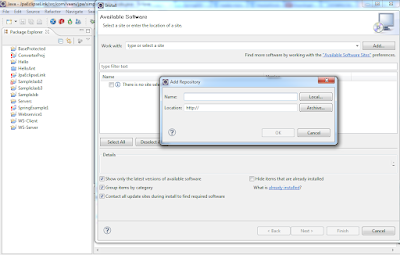
  1. Click Help->Install new software:


  2. New popup will come up:
  3.  
  4. Now add the name of the update and the update URL.
    Note that name is required just for the sake of knowing what you are updating when you update it again.


    For example, you are installing eclipse plugin, just write name as anything you want to give like springIde, and URL like http://springide.org/updatesite


Thank you.

Thursday, 21 April 2011

Jad Decompiler Plug-in for Eclipse

JAD Eclipse is an eclipse plug-in for the JAD Decompiler. The following is a quick description of how to setup JAD Eclipse (assuming you already have eclipse setup).
  1. Download the latest version of JAD decompiler and set modify your path to add JAD_HOME directory.
  2. Download the latest version of JAD Eclipse from the link shown above and extract it to your eclipse plugins directory.
  3. Restart eclipse and configure JAD as follows
    1. In eclipse, go to - Window->Preferences->Java->JadClipse
    2. Set Path to decompiler to "jad" (jad is already in your path).Click Apply.
This is the basic setup for running JAD Eclipse. You will be able to look in to you library classes by simply clicking on the class file, or the class in the type hierarchy. If you are in the J2EE perspective, you can open up you jar files and look into those class files too. It is up to you to decide how you want to go. By the way, JAD eclipse also has a lot of additional customizations available, which can be seen under JAD Eclipse preferences in Eclipse.

Eclipse Test and Performance Tools Platform

Eclipse Test and Performance Tools Platform (TPTP) provides a comprehensive suite of open source performance-testing and profiling tools, including integrated application monitoring, testing, tracing and profiling log analyzing and static-code analysis tools. The Eclipse Callisto 3.2 release includes version 4.2 of the Eclipse Test & Performance Tools Platform (TPTP). OnJava.com recently featured an introduction to using the tool. TPTP lets you test several aspects of your application's behavior, including memory usage, execution statistics, and test coverage.

Installing TPTP

Open the Remote Update window (Help -> Software Updates -> Find and Install), and select the Callisto Discovery Site. If Callisto Discovery Site is not listed, add a "New Remote Site", and add http://download.eclipse.org/callisto/releases/, to the list and select it. You will have to select the "Charting and Reporting", "Enabling features" and "Testing and Performance" options to install.

Profiling with Eclipse TPTP

Follow these steps to profile an application

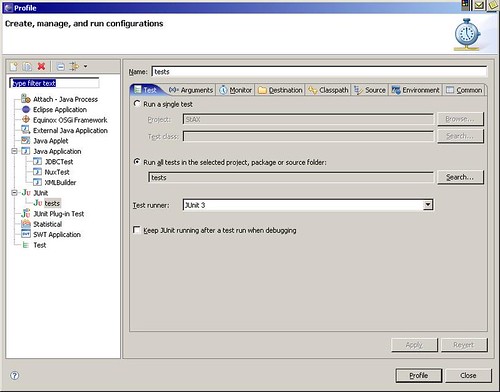
  1. Create a JUnit test profile using "Run -> Profile" option from the main menu. If you have a test package, it will be automatically selected in the "Test" tab of the profile dialog box.
    Eclipse TPTP profiling -1
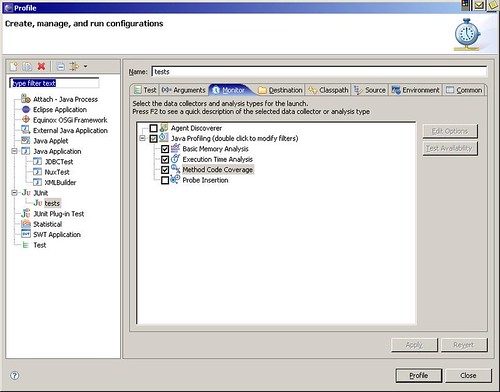
  2. Select the "Monitor" tab and choose the required options.
    Eclipse TPTP profiling - 2
  3. Click on profile.
Once eclipse finishes profiling, you can go to the "Profiling and Logging" perspective and analyze the results of the profiler.
References:
  1. Profiling Your Applications with Eclipse Callisto
  2. Eclipse Test and Performance Tools Platform
  3. Introduction: Eclipse Test and Performance Tools Platform (Tutorial)
  4. Eclipse Test and Performance Tools Platform, Part 1: Test, profile, and monitor applications (Tutorial)
  5. Eclipse Test and Performance Tools Platform, Part 2: Monitor applications (Tutorial)

Eclipse SQL Explorer

Eclipse SQL Explorer 3, an Eclipse plugin that allows you to query and browse any JDBC compliant database, has been released. The SQL Explorer adds a new perspective and a few new views to eclipse. The following is a short list:
  • The SQL editor provides syntax highlighting and content assist.
  • Using the Database Structure view, you can explore multiple databases simultaneously. When a node is selected, the corresponding detail is shown in the database detail view.
  • Provides database-specific features for DB2, Oracle, and MySQL)

Tuesday, 19 April 2011

Google Android ADT, SDK and Eclipse IDE integration on Linux

http://viralpatel.net/blogs/2009/04/google-android-adt-sdk-and-eclipse-ide-integration-on-linux.html
http://learnaboutandroid.blogspot.com/2011/05/setting-up-your-androidjava-environment.html

Creating struts application in eclipse

http://viralpatel.net/blogs/2008/12/tutorial-creating-struts-application-in-eclipse.html
Note: If you looking for tutorial “Create Struts2 Application in EclipseClick here.
In this tutorial we will create a hello world Struts application in Eclipse editor. First let us see what are the tools required to create our hello world Struts application.
  1. JDK 1.5 above (download)
  2. Tomcat 5.x above or any other container (Glassfish, JBoss, Websphere, Weblogic etc) (download)
  3. Eclipse 3.2.x above (download)
  4. Apache Struts JAR files:(download). Following are the list of JAR files required for this application.
    • struts.jar
    • common-logging.jar
    • common-beanutils.jar
    • common-collections.jar
    • common-digester.jar
We will implement a web application using Struts framework which will have a login screen. Once the user is authenticated, (s)he will be redirected to a welcome page.
Let us start with our first struts based web application.
Open Eclipse and goto File -> New -> Project and select Dynamic Web Project in the New Project wizard screen.

After selecting Dynamic Web Project, press Next.

Write the name of the project. For example StrutsHelloWorld. Once this is done, select the target runtime environment (e.g. Apache Tomcat v6.0). This is to run the project inside Eclipse environment. After this press Finish.
Once the project is created, you can see its structure in Project Explorer.

Now copy all the required JAR files in WebContent -> WEB-INF -> lib folder. Create this folder if it does not exists.
Next step is to create a servlet entry in web.xml which points to org.apache.struts.action.ActionServlet class of struts framework. Open web.xml file which is there under WEB-INF folder and copy paste following code.
01
02
03
04
05
06
07
08
09
10
11
12
13
14
15
<servlet>
        <servlet-name>action</servlet-name>
        <servlet-class>
            org.apache.struts.action.ActionServlet
        </servlet-class>
        <init-param>
            <param-name>config</param-name>
            <param-value>/WEB-INF/struts-config.xml</param-value>
        </init-param>
        <load-on-startup>1</load-on-startup>
</servlet>
<servlet-mapping>
    <servlet-name>action</servlet-name>
    <url-pattern>*.do</url-pattern>
</servlet-mapping>

Here we have mapped url *.do with the ActionServlet, hence all the requests from *.do url will be routed to ActionServlet; which will handle the flow of Struts after that.
We will create package strutcures for your project source. Here we will create two packages, one for Action classes (net.viralpatel.struts.helloworld.action) and other for Form  beans(net.viralpatel.struts.helloworld.action).

Also create a class LoginForm in net.viralpatel.struts.helloworld.action with following content.

package net.viralpatel.struts.helloworld.form;
 
import javax.servlet.http.HttpServletRequest;
import org.apache.struts.action.ActionErrors;
import org.apache.struts.action.ActionForm;
import org.apache.struts.action.ActionMapping;
import org.apache.struts.action.ActionMessage;
 
public class LoginForm extends ActionForm {
 
    private String userName;
    private String password;
 
    public ActionErrors validate(ActionMapping mapping,
            HttpServletRequest request) {
 
        ActionErrors actionErrors = new ActionErrors();
 
        if(userName == null || userName.trim().equals("")) {
            actionErrors.add("userName", new ActionMessage("error.username"));
        }
        try {
        if(password == null || password.trim().equals("")) {
            actionErrors.add("password", new ActionMessage("error.password"));
        }
        }catch(Exception e) {
            e.printStackTrace();
        }
        return actionErrors ;
    }
 
    public String getUserName() {
        return userName;
    }
    public void setUserName(String userName) {
        this.userName = userName;
    }
    public String getPassword() {
        return password;
    }
    public void setPassword(String password) {
        this.password = password;
    }
}

Introducing Cache support in Spring 3.1 M1

Spring 3.1 M1 is out with some very useful features. One of the coolest feature in the latest release is comprehensive Caching support!
Spring Framework provides support for transparently adding caching into an existing Spring application. Similar to the transaction support, the caching abstraction allows consistent use of various caching solutions with minimal impact on the code.
The cache is applied to Java methods, reducing the number of executions based on the information available. Spring checks if the given method is already executed for given set of parameters. If the method is already executed, Spring uses the cache value and returns it to caller instead of calling the method again. This is a write through cache. This way, expensive methods (whether CPU or IO bound) can be executed only once for a given set of parameters and the result reused without having to actually execute the method again. The caching logic is applied transparently without any interference to the invoker.

Adding Cache support to Spring project

In order to add Cache support to any Spring based project, one needs to declare the configuration using new Spring tag in the schema declaration.
<beans xmlns="http://www.springframework.org/schema/beans" xmlns:xsi="http://www.w3.org/2001/XMLSchema-instance"
xmlns:cache="http://www.springframework.org/schema/cache"
xsi:schemaLocation="http://www.springframework.org/schema/beans http://www.springframework.org/schema/beans/spring-beans.xsd
http://www.springframework.org/schema/cache http://www.springframework.org/schema/cache/spring-cache.xsd
">

<cache:annotation-driven />
...
</beans>

Note the cache:annotation-driven tag in above declaration enables the caching in given Spring project.

Using @Cacheable and @CacheEvict annotations

Spring 3.1 M1 provides two very useful Java annotations: @Cacheable and @CacheEvict which allow methods to trigger cache population or cache eviction. Let us take a closer look at each annotation:
@Cacheable("persons")
public Person profile(Long personId) { ... }

In the above code snippet, method profile is marked cacheable using @Cacheable annotation. Also the method is associated with a cache named “persons“. Whenever method profile is called, the Spring framework will check if cached entry is available in persons cache and returns the same without calling profile method.
It is also possible to provide multiple cache names if you have multiple caches declared in your application. For example:
@Cacheable({"persons", "profiles"})
public Person profile(Long personId) { ... }

In above code snippet, we provide two cache names persons and profiles. Spring framework will check in all the caches if entry is available for given method call with argument personId, if at least one cache is hit, then the associated value will be returned.

@CacheEvict annotation

Cache eviction is removing of any unused or stale data from the cache. Opposed to @Cacheable, annotation @CacheEvict demarcates methods that perform cache eviction, that is methods that act as triggers for removing data from the cache. Just like its sibling, @CacheEvict requires one to specify one (or multiple) caches that are affected by the action, allows a key or a condition to be specified but in addition, features an extra parameter allEntries which indicates whether a cache-wide eviction needs to be performed rather then just an entry one (based on the key):
@CacheEvict (value = "persons", allEntries=true)
public List<Person> listPersons()

This annotation is very useful when an entire cache region needs to be cleared out. The Spring framework will ignore any key specified in this scenario as it does not apply.

Using Default key

The cache is nothing but a key-value store which stores the data based on certain key. In Spring framework based caching, the method arguments of cached method acts as the source of Key generation. Every key is essentially the Hash-code of these arguments. This approach works well for objects with natural keys as long as the hashCode() reflects that. If that is not the case then for distributed or persistent environments, the strategy needs to be changed as the objects hashCode is not preserved. In fact, depending on the JVM implementation or running conditions, the same hashCode can be reused for different objects, in the same VM instance.
To provide a different default key generator, one needs to implement the org.springframework.cache.KeyGenerator interface. Once configured, the generator will be used for each declaration that does not specify its own key generation strategy.
By default, all the method arguments are used in Key generation logic. In practice not all methods have only one argument or, worse yet, the parameters are not suitable as cache keys – take for example a variation of the method above:
@Cacheable(value="persons", key="personId")
public Person profile(Long personId, Long groundId) { ... }

Here we are using just personId in key generation ignoring groupId altogether.

Understand Conditional caching

Spring framework also supports conditional caching letting user to cache certain methods based on some conditions. For example, in following code snippet we cache profiles only for those users who have profileId greater than 50:
@Cacheable(value="persons", condition="personId > 50")
public Person profile(Long personId) { ... }

Currently supported libraries

There are probably hundreds of cache libraries available which can be used in your JEE project. For now the Spring framework supports following implementations:
  1. JDK ConcurrentMap based Cache
  2. Ehcache based Cache

JDK ConcurrentMap based Cache

The JDK-based Cache implementation resides under org.springframework.cache.concurrent package. It allows one to use ConcurrentHashMap as a backing Cache store.

<!-- generic cache manager -->
<bean id="cacheManager" class="org.springframework.cache.support.SimpleCacheManager">
<property name="caches">
<set>
<bean class="org.springframework.cache.concurrent.ConcurrentCacheFactoryBean" p:name="default"/>
<bean class="org.springframework.cache.concurrent.ConcurrentCacheFactoryBean" p:name="persons"/>
</set>
</property>
</bean>

In above code snippet, we use SimpleCacheManager class to create a CacheManager. Note that we have created two caches in our application, one is default and second is persons.

Ehcache based Cache

The Ehcache implementation is located under org.springframework.cache.ehcache package. Again, to use it, one simply needs to declare the appropriate CacheManager:
<bean id="cacheManager" class="org.springframework.cache.ehcache.EhcacheCacheManager" p:cache-manager="ehcache"/>

<!-- Ehcache library setup -->
<bean id="ehcache" class="org.springframework.cache.ehcache.EhCacheManagerFactoryBean" p:config-location="ehcache.xml"/>

This setup bootstraps ehcache library inside Spring IoC (through bean ehcache) which is then wired into the dedicated CacheManager implementation. Note the entire ehcache-specific configuration is read from the resource ehcache.xml.

References

Monday, 18 April 2011

Some dependency injection frameworks

Google has its Guice (pronounced as juice). See here for more.

Dependency injection in .net can be done by spring.net or prism. Refer this book for more:

Sunday, 17 April 2011

Spring replacement for jdk timer task

Create a scheduler task…
package com.vaani.scheduler.common;
 
public class RunMeTask
{
public void printMe() {
System.out.println("Run Me ~");
}
}

Now configuring the spring xml file:

<bean id="runMeTask" class="com.vaani.scheduler.common.RunMeTask" />
 
You can define your target scheduler object and method to call here.
<bean id="schedulerTask" 
class="org.springframework.scheduling.timer.MethodInvokingTimerTaskFactoryBean">
<property name="targetObject" ref="runMeTask" />
<property name="targetMethod" value="printMe" />
</bean>


Spring comes with a ScheduledTimerTask as a replacement for the JDK Timer. You can pass your scheduler name, delay and period here.
<bean id="timerTask"
class="org.springframework.scheduling.timer.ScheduledTimerTask">
<property name="timerTask" ref="schedulerTask" />
<property name="delay" value="1000" />
<property name="period" value="60000" />
</bean>
In last, you can configure a TimerFactoryBean bean to start your scheduler task.
<bean class="org.springframework.scheduling.timer.TimerFactoryBean">
<property name="scheduledTimerTasks">
<list>
<ref local="timerTask" />
</list>
</property>
</bean>
Spring-Scheduler.xml
<beans xmlns="http://www.springframework.org/schema/beans"
xmlns:xsi="http://www.w3.org/2001/XMLSchema-instance"
xsi:schemaLocation="http://www.springframework.org/schema/beans
http://www.springframework.org/schema/beans/spring-beans-2.5.xsd">

 
<bean id="schedulerTask"
class="org.springframework.scheduling.timer.MethodInvokingTimerTaskFactoryBean">
<property name="targetObject" ref="runMeTask" />
<property name="targetMethod" value="printMe" />
</bean>
 
<bean id="runMeTask" class="com.mkyong.common.RunMeTask" />
 
<bean id="timerTask"
class="org.springframework.scheduling.timer.ScheduledTimerTask">
<property name="timerTask" ref="schedulerTask" />
<property name="delay" value="1000" />
<property name="period" value="60000" />
</bean>
 
<bean class="org.springframework.scheduling.timer.TimerFactoryBean">
<property name="scheduledTimerTasks">
<list>
<ref local="timerTask" />
</list>
</property>
</bean>
 
</beans>
Run it
package com.mkyong.common;
 
import org.springframework.context.ApplicationContext;
import org.springframework.context.support.ClassPathXmlApplicationContext;
 
public class App
{
public static void main( String[] args )
{
ApplicationContext context =
new ClassPathXmlApplicationContext("Spring-Scheduler.xml");
}
}
No code need to call the scheduler task, the TimerFactoryBean will run your schedule task during start up. As result, Spring scheduler will run the printMe() method every 60 seconds, with a 1 second delay for the first time of execution.

Friday, 15 April 2011

Database Connection Pooling in Tomcat using Eclipse

While using Maven as build tool in our project, I found it very difficult to create a Dynamic Web Project which supports Maven dependencies and can execute in Eclipse! I have seen lot of people using Maven just as build tool and for local setup uses jar files in some /lib directory. I wanted to remove this dependencies on local /lib for jar files and resolve everything with Maven. My project should be a Dynamic web project with Maven dependencies enabled.
Here is a simple tutorial which you can go through to create Dynamic Web Project having Maven enabled in Eclipse. This project can be used as base project and can be easily converted to most kind of project like Struts based, Spring MVC based etc.

Required Tools

For this tutorial, I assume you have following setup in your machine.
1. JDK 1.5 or above (download)
2. Eclipse 3.2 or above (download)
3. Maven 2.0 or above (download)
4. M2Eclipse Plugin (download)

Step 1: Create Maven Project in Eclipse

Create a new project in Eclipse. Goto File > New > Project.. and select Maven Project from the list. Click Next.
eclipse-maven-new-project
Enter “MavenWeb” as Project name and click Next. On Configuration screen, select war in Packaging and also check the checkbox for src/main/webapp.
new-maven-project
Once done, click Finish. This will create a Maven project in Eclipse.

Step 2: Generate Eclipse Project with WTP

Let us convert the Maven project to Dynamic Web Project for Eclipse. For this we will use following maven command.
1
mvn eclipse:eclipse -Dwtpversion=1.5
Goto the folder where the new project is created and execute above command.
C:\Workspace\Test\MavenWeb>mvn eclipse:eclipse -Dwtpversion=1.5

[INFO] Scanning for projects...
[INFO] Searching repository for plugin with prefix: 'eclipse'.
[INFO] ------------------------------------------------------------------------
[INFO] Building Unnamed - MavenWeb:MavenWeb:war:0.0.1-SNAPSHOT
[INFO] task-segment: [eclipse:eclipse]
[INFO] ------------------------------------------------------------------------
[INFO] Preparing eclipse:eclipse
[INFO] No goals needed for project - skipping
[INFO] [eclipse:eclipse]
[INFO] Adding support for WTP version 1.5.
[INFO] Using Eclipse Workspace: C:\Workspace\Test
[INFO] no substring wtp server match.
[INFO] Using as WTP server : Apache Tomcat v5.5
[INFO] Adding default classpath container: org.eclipse.jdt.launching.JRE_CONTAINER
[INFO] Not writing settings - defaults suffice
[INFO] Wrote Eclipse project for "MavenWeb" to C:\Workspace\Test\MavenWeb.
[INFO]
[INFO] ------------------------------------------------------------------------
[INFO] BUILD SUCCESSFUL
[INFO] ------------------------------------------------------------------------
[INFO] Total time: 4 seconds
[INFO] Finished at: Wed Jul 28 13:55:09 CEST 2010
[INFO] Final Memory: 7M/30M
[INFO] ------------------------------------------------------------------------
That’s it. We just created Dynamic Web Project from Maven project. Now refresh the project in Eclipse.

Step 3: Change Project Facet

The above step by default set the project facet to JDK 1.4. We need to modify this and set project facet to JDK 5. Right click on MavenWeb project and select Properties (shortcut: Alt+Enter). From the Properties dialog box, select Project Facets. Now click on “Modify Project…” button and change the project facet to Java 5.0
project-facet-maven-eclipse

Step 4: Setting Build Path

We need to specify the Maven jar dependencies in Java Build Path of our MavenWeb project. Open Properties.. dialog box (Alt+Enter) and select Java Build Path. Click “Add Library..” button and select “Maven Managed Dependencies” and click Finish.
maven-eclipse-build-path

Step 5: Hello World Servlet

Our dynamic web project with maven support is done now. Let us add a small Hello World servlet to this project and see how it works.
Open pom.xml from root folder and copy following content into it.
File: pom.xml

<?xml version="1.0" encoding="UTF-8"?>
<project>
    <modelVersion>4.0.0</modelVersion>
    <groupId>MavenWeb</groupId>
    <artifactId>MavenWeb</artifactId>
    <packaging>war</packaging>
    <version>0.0.1-SNAPSHOT</version>
    <description></description>
    <build>
                <plugins>
                        <plugin>
                                <artifactId>maven-compiler-plugin</artifactId>
                                <configuration>
                                        <source>1.5</source>
                                        <target>1.5</target>
                                </configuration>
                        </plugin>
            <plugin>
                <artifactId>maven-war-plugin</artifactId>
                <version>2.0</version>
            </plugin>
        </plugins>
    </build>
    <dependencies>
        <dependency>
            <groupId>javax.servlet</groupId>
            <artifactId>servlet-api</artifactId>
            <version>2.5</version>
        </dependency>
    </dependencies>
</project>
 
Also create a servlet file HelloWorldServlet.java. We will add this servlet in net.viralpatel.maven package.
File: /src/main/java/net/viralpatel/maven/HelloWorldServlet.java
01
02
03
04
05
06
07
08
09
10
11
12
13
14
15
16
17
18
19
20
21
22
23
24
25
package net.viralpatel.maven;
 
import java.io.IOException;
import java.io.PrintWriter;
 
import javax.servlet.ServletException;
import javax.servlet.http.HttpServlet;
import javax.servlet.http.HttpServletRequest;
import javax.servlet.http.HttpServletResponse;
 
public class HelloWorldServlet extends HttpServlet {
 
    private static final long serialVersionUID = 1031422249396784970L;
 
    public void doGet(HttpServletRequest req, HttpServletResponse resp)
            throws ServletException, IOException {
 
        resp.setContentType("text/html");
 
        PrintWriter out = resp.getWriter();
        out.print("Hello World from Servlet");
        out.flush();
        out.close();
    }
}
Once the servlet is created, let us configure this in web.xml. Note that in our maven project no web.xml is present. We will create one at /src/main/webapp/WEB-INF/ location.
File: /src/main/webapp/WEB-INF/web.xml
01
02
03
04
05
06
07
08
09
10
11
12
13
14
15
16
17
18
19
20
21
22
23
<?xml version="1.0" encoding="UTF-8"?>
<web-app xmlns:xsi="http://www.w3.org/2001/XMLSchema-instance"
    xmlns="http://java.sun.com/xml/ns/javaee"
    xmlns:web="http://java.sun.com/xml/ns/javaee/web-app_2_5.xsd"
    xsi:schemaLocation="http://java.sun.com/xml/ns/javaee http://java.sun.com/xml/ns/javaee/web-app_2_5.xsd"
    id="WebApp_ID" version="2.5">
    <display-name>HelloWorldServlet</display-name>
    <welcome-file-list>
        <welcome-file>hello-world</welcome-file>
    </welcome-file-list>
 
    <servlet>
        <servlet-name>HelloWorldServlet</servlet-name>
        <servlet-class>
            net.viralpatel.maven.HelloWorldServlet
        </servlet-class>
        <load-on-startup>1</load-on-startup>
    </servlet>
    <servlet-mapping>
        <servlet-name>HelloWorldServlet</servlet-name>
        <url-pattern>/hello-world</url-pattern>
    </servlet-mapping>
</web-app>

That’s All Folks

Our dynamic web project with Maven support in Eclipse is completed. Run the web project in eclipse (Alt+Shirt+X, R)
hello-world-maven-eclipse-web-project